This, quite deservedly, is King Arthur Flour’s recipe of the year.
It is a wonderful puffy deep-dish pizza you can make in your cast-iron skillet. Easy-peasy, by the way.
Here is the recipe.
It’s a pizza!
 Save Recipe
Ingredients
- 2 C. all-purpose flour
- 3/4 t. salt
- 1/2 t. yeast
- 3/4 C. lukewarm water
- 1 T. olive oil (and 1 1/2 T. olive oil for the pan)
- 6 oz. grated mozzarella (or more!)
- 1/3 to 1/2 C. tomato sauce or pizza sauce
- Freshly-grated hard cheese and fresh herbs for sprinkling on top after baking (optional)
- Sliced black olives (optional)
For The Pizza
For The Pan
Instructions
- Put flour, salt, yeast, water, and 1 tablespoon of olive oil in the bowl of a stand mixer. Using the paddle attachment on your mixer, mix all the ingredients together (about 45 seconds) until you have a sticky mass of dough with no dry patches of flour. Scrape down the sides of the bowl and, using wet hands, gather the dough into a ball. Cover the bowl and let the dough sit for 5 minutes.
- After the 5 minute rest, reach into the bowl and begin to stretch and fold the dough. You will do this four times. After each stretch and fold, you will cover the bowl and let the dough rest for 5 minutes. King Arthur Flour describes a stretch and fold this way: "Reach a bowl scraper or your wet hand down between the side of the bowl and the dough, as though you were going to lift the dough out. Instead of lifting, stretch the bottom of the dough up and over its top. Repeat three more times, turning the bowl 90 degrees each time. This process of four stretches, which takes the place of kneading, is called a fold."
- Once you have completed the series of stretch and folds, cover the bowl and let the dough sit for 40 minutes. After the 40 minute rest, refrigerate the dough for at least 12 hours and for up to 72 hours. The dough will rise slowly during the refrigerated period and letting it rest for hours will develop the flavor of the dough.
- Three hours before you plan to bake your pizza, put 1 1/2 tablespoons of olive oil in a 10-inch cast iron skillet. Be sure the oil is evenly distributed on the bottom of the skillet and, using your hands, rub the olive oil up the sides of the skillet.
- Take your dough out of the refrigerator and place it in the oiled skillet. Turn it over once. You want the dough to have a nice coat of olive oil on both sides.
- Once you have the dough oiled and in the skillet, use your fingers to press the dough to the edges of the pan. Then, use your fingers to push indentations all over the top of the dough, dimpling it. If the dough is tight and doesn't press out to the sides, let the dough rest for 15 minutes and try it again (You can do this three times if you need to.). Now, cover the dough and let it rise for two hours at room temperature. It will become puffy and, when it is properly risen, will jiggle when you shake the skillet.
- Preheat your oven to 450 degrees F. (You will want to begin preheating your oven about 30 minutes before you plan to bake your pizza.) You will want one of the oven racks to be toward the bottom of the oven and one toward the top of the oven.
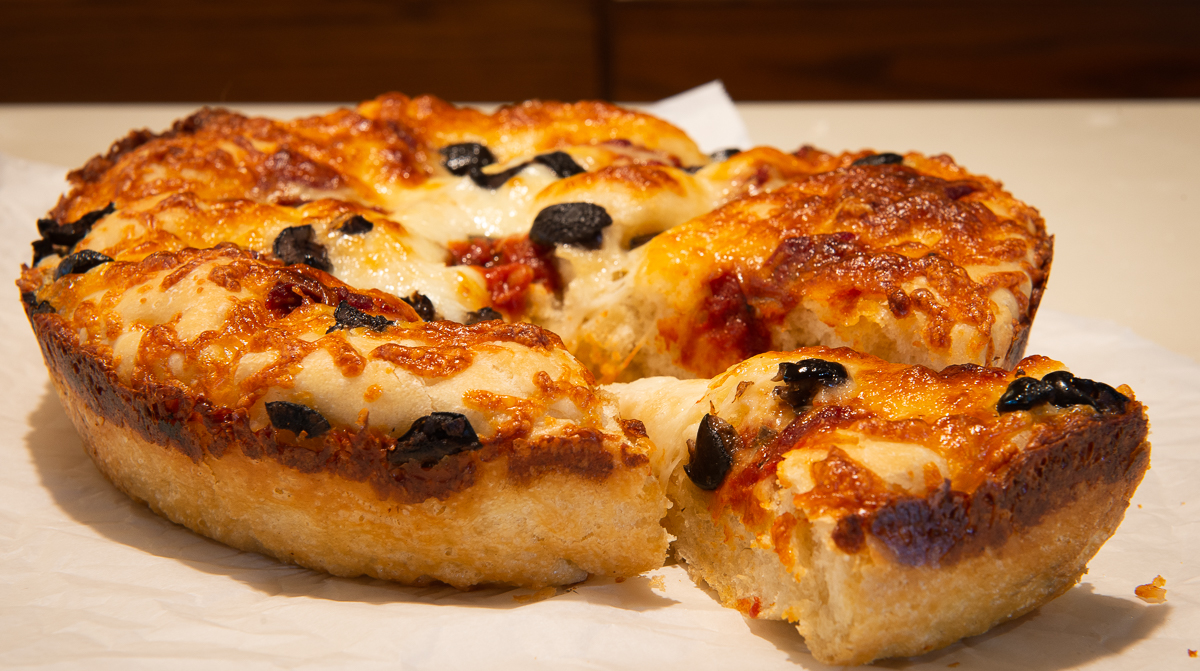
- When you are ready to bake your pizza, sprinkle about 3/4 of the grated mozzarella over the top of the pizza. Spread it evenly so that the crust is completely covered. Put dollops of your tomato sauce on top of the mozzarella. Finally, cover with rest of the grated mozzarella and the black olives if you are using them.
- Bake the pizza on the bottom rack of your pre-heated oven for 18-20 minutes. When the pizza is done, the cheese should be bubbling, the bottom crust should be a light brown and the top of the pizza should be a rich golden brown. (You can check the bottom of the crust by using a metal spatula to lift up an edge of the dough.) At this point, you have a couple of options. If the bottom of the crust is brown but the top does not look sufficiently baked, put the pizza on the top rack in your heated oven for a couple minutes. If the bottom of the crust isn't brown, you can leave it on the bottom shelf for 2 to 4 more minutes. Watch your pizza carefully during this last part of baking to ensure that it doesn't burn.
- When your pizza is done, remove it from the oven and put it on a heat-proof surface. Run a sharp knife between the side of the pan and the pizza to release any areas that might be sticking. Let the pizza cool a bit and then carefully remove it from the pan. Put it on a cooling rack.
- Pizza should be served medium hot to warm. You can use a serrated knife or kitchen scissors to slice the pizza.
- Enjoy.
7.8.1.2
234
https://bluecayenne.com/its-a-pizzaYou can find the original King Arthur Flour recipe for this pizza here.


1 thought on “It’s a pizza!”