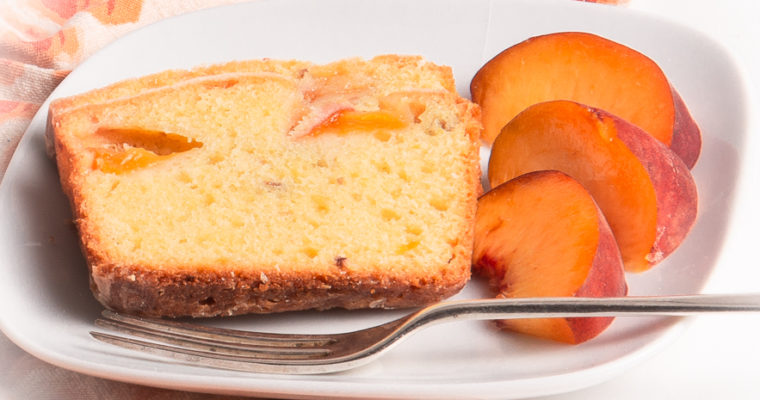
Author: Blue Cayenne

Peach Poundcake

Peach Poundcake

Ah, peaches! Peaches originated in China thousands of years ago. Persian traders, in turn, introduced the fruit to Europe and called it the “Persian Apple.” Explorers and colonists introduced them to the Americas. They are beloved just about everywhere. Don’t ask for one in Turkey,…

My “Hero”:  Frosty Lime Sherbet

My “Hero”: Frosty Lime Sherbet

There is something truly wonderful about photographing ice cream–or, in this case, sherbet. It melts. Oh, you know, there is the interminable fiddling around with the food styling. Gotta try a gazillion angles and backgrounds. White bowl? Green bowl? Mint sprig? This is a hard…

Me and The Queen of Sheba: Apricot Pistachio Bars

Me and The Queen of Sheba: Apricot Pistachio Bars

Legend has it that the Queen of Sheba so loved pistachios that she claimed ownership of all the pistachio trees in her realm.

That’s kind of the way I feel about these Apricot Pistachio Bars. They are that good.

These bars sport a generous top layer of fresh apricots, a middle layer of pistachio filling (wow!), and a crisp-tender bottom crust layer.

Here’s the recipe.


Apricot Pistachio Bars
Save RecipeSave Recipe

Ingredients

    Crust
  • 1 C. all-purpose flour
  • 1/4 t. table salt
  • 1/4 C. granulated sugar
  • 1/2 C. unsalted butter (cold and cut into cubes)
  • Filling
  • 3/4 C. shelled unsalted pistachios
  • 1 T. all-purpose flour
  • A few pinches of sea salt
  • 6 T. granulated sugar
  • 5 T. unsalted butter (cold and cut into cubes)
  • 1 large egg (room temperature)
  • 1/4 t. almond extract
  • 1 pound firm-ripe apricots (halved and pits removed)
  • Powdered sugar for garnish

Instructions

  1. Preheat oven to 350 degrees F. and line an 8 by 8 inch pan with two 12-inch layers of parchment. Fit the layers of parchment in the pan perpendicular to each other and allow the parchment to overhang the sides of the pan so that you have "handles" to help you lift the baked bars from the pan. They will be fragile until they cool.
  2. First, make the crust. Put flour, salt and sugar into the bowl of your food processor and pulse the ingredients to combine them. Then cut the butter into cubes and add it to the dry ingredients. Process until the mixture comes together in large clumps. This should take between 30 seconds and a minute. Remove the dough from the processor bowl and press it onto the bottom and sides (about 1/4 inch up the sides) of your prepared pan. If your dough is sticky and hard to press into the pan, try dusting your fingers with a little flour. Bake the crust for about 15 minutes until it is a pale golden brown color. Remove the crust from the oven and put the crust in the freezer for about 10 to 15 minutes to firm it up while you prepare the rest of the ingredients.
  3. To prepare the filling, combine pistachios, flour, salt and sugar in the bowl of your processor and process until the pistachios are a powdery consistency. Add the cubes of butter to the bowl and process until the mixture is well-combined. You do not want to see any butter chunks in the mixture; it should be totally combined with the pistachio mixture. The pistachio mixture will have a paste-like consistency. Add almond extract and egg and process until combined.
  4. Remove the crust from the freezer and spread the pistachio filling evenly across the crust. Be sure to spread the filling into the edges of the pan. You will want pistachio goodness in every part of this wonderful bar.
  5. Top the pistachio filling with the apricots. You can simply arrange the apricot halves neatly on top of the filling. You can arrange the apricots cut side up or cut side down. Alternatively, you can slice the apricots into strips and fan them on top of the bars as I did. I cut thin slices part way through each apricot half but didn't cut through to the top so that the apricot halves would hold together. Then I pressed the sliced apricot half lightly to make a fan of the apricot slices and arranged them decoratively on top of the pistachio filling.
  6. Bake the bars for approximately 60 minutes in your preheated 350 degree F. oven. Watch them carefully. You want the crust to brown but it would be easy to over-bake the bars and burn the bottom. Your bars are done when you can insert a toothpick into the pistachio portion of the bars and the toothpick comes out batter free.
  7. Remove the baked bars from the oven. Let them cool in the pan and then, using the parchment "handles" lift the bars out of the pan. Once the bars are totally cool, slice them into bars. (You can put the bars into the refrigerator for a few minutes to speed things up.) I used my pizza cutter to cut the bars. If you have apricot juices that have spilled over the edges of the bars and burned a bit (as I did) you can trim off those edges at this point. (The edges with the caramelized apricot juices taste wonderful, though. Don't throw them away! Consider them the cook's bonus.)
  8. Dust the bars with powdered sugar and serve.
7.8.1.2
239
https://bluecayenne.com/me-and-the-queen-of-sheba-apricot-pistachio-bars


This recipe is adapted from one on the Smitten Kitchen site. You can find the original recipe here.

Triple Lutzes and Shortbread Cookies

Triple Lutzes and Shortbread Cookies

  It’s all about cookies around here. In Juliet’s case, it is her beloved pumpkin treats. The pup savors every crumb and dances for more. Think I’m exaggerating? Ask my neighbors and you will get a knowing nod. Around here, Juliet is known for her…

Gadget Madness: Spiralized Vietnamese Cucumber Salad

Gadget Madness: Spiralized Vietnamese Cucumber Salad

I’m a gadget girl. I have drawers and drawers (and drawers!) of cooking tools–some whose function I no longer remember. So, like most of the rest of the cooks in America right now, I’ve been doing some pandemic kitchen cleaning and organizing. I’ve put off…

A Birthday? Be Sure to Invite the Goddess of the Moon

A Birthday? Be Sure to Invite the Goddess of the Moon

“And I rose
In rainy autumn
And walked abroad in a shower of all my days…”
Dylan Thomas

Birthdays. How in the world do you celebrate important days during a pandemic?

With a cake!

However it happens–store-bought or homemade, left on the front porch or served at a respectable social distance–the birthday cake is non-negotiable.

Trust me on this. Birthday cakes have been central to celebrations for a very long time

The Greeks, Egyptians and Romans all celebrated important events with a celebratory cake.

The Greek story is particularly interesting. Their cakes were moon-shaped to celebrate the birth date of Artemis, the goddess of the moon. Each cake  was decorated with candles to glow like the moon. How cool is that? I’ll never think about candles on a birthday cake the same way again.

Our modern birthday cake tradition, though, appears to be more closely tied to 18th Century Germany where  children’s birthdays were celebrated with cakes, candles and secret wishes. The celebration was called Kinderfest. A child’s cake bore one candle for each year of the child’s life and one extra candle, a candle of life, to celebrate the hope that the child would enjoy another year of life until the next birthday. The candles on the cake were lit at sunrise and it was the task of the family to keep them lit throughout the day until the evening celebration. (I’m thinking there must have been a whole lot of wax on that cake by the end of the day, but never mind.)

Here is a birthday cake I made for my good friend and neighbor Norma. Happy, happy day, Norma.

Here’s the recipe.

Vanilla Birthday Cake
Save RecipeSave Recipe

Ingredients

    For The Cake
  • 2 C. all-purpose flour
  • 1 1/4 t. salt
  • 2 t. baking powder
  • 4 large eggs (room temperature)
  • 2 C. granulated sugar
  • 1 T. vanilla extract
  • 1/8 t. almond extract
  • 1 C. milk
  • 4 T. butter (cut into cubes)
  • 1/3 C. vegetable oil (I used Canola)
  • For the Frosting
  • 8 T. unsalted butter (room temperature)
  • Pinch of salt
  • 1 T. meringue powder (optional--increases strength of the frosting)
  • 1 t. vanilla extract
  • 3 C. confectioners' sugar
  • 2 to 4 T. milk

Instructions

    For the cake
  1. Preheat your oven to 325 degrees F. Your oven rack should be positioned in the center of the oven. Prepare two 8 or 9 inch round cake pans by greasing them and lining the bottoms of the pans with parchment. Grease the top of the parchment, too.
  2. Combine flour, salt and baking powder in a bowl. Whisk to combine. Set aside.
  3. Beat eggs, sugar, vanilla and almond extract in the bowl of your stand mixer using the whisk attachment. Beat at medium high speed for about 2 minutes. You want the egg mixture to thicken and be light in color.
  4. Add the dry ingredients to the egg mixture. Mix just to combine at a low speed. Be sure to use a spatula to scrape the bottom and sides of the bowl and then mix again briefly to be sure all the flour is incorporated into the batter.
  5. In a microwave or in a pan on the stove, heat the milk until it simmers. Remove the milk from the microwave (or from the heat on the stove) and stir in the butter and oil. Keep stirring the mixture until the butter has melted.
  6. Slowly mix the milk mixture into the egg/flour batter until everything is well combined. Be sure to scrape the bowl to be sure everything is combined.
  7. Pour batter into your two prepared pans and bake at 325 degrees F. for about 38-42 minutes if you are using 8-inch pans or 26-30 minutes if you are using 9-inch pans. Test the cake for doneness by inserting a toothpick into the centers of the cakes. ( The toothpick should come out clean with no batter sticking to the toothpick. You can also check your cakes by using a digital thermometer inserted into the center of the cakes. The thermometer should read 205 degrees F is the cake is done.)
  8. Remove the cakes from the oven, run a knife around the edges to loosen the cakes from the pans and let the cakes cool on a rack for about 15 minutes. Once the cakes are cool, turn them out of the pans and transfer them to a rack to cool to room temperature before frosting.
  9. For the Frosting
  10. Beat butter in the bowl of your stand mixer until it is fluffy.
  11. Add the salt, meringue powder (optional) and vanilla. Beat to combine.
  12. Add the confectioners' sugar and 2 T. of milk. Beat until the mixture is smooth, scraping the sides and bottom of the bowl while you are mixing to be sure you have incorporated all the sugar.
  13. Add additional milk (or confectioners' sugar) to adjust the consistency of the frosting for easy icing and piping.

Nutrition

Calories

6145 cal

Fat

177 g

Carbs

992 g

Protein

35 g
Click Here For Full Nutrition, Exchanges, and My Plate Info
7.8.1.2
236
https://bluecayenne.com/a-birthday-be-sure-to-invite-the-goddess-of-the-moon


This cake recipe is adapted from one that appears on the King Arthur Flour site KAF Birthday Cake.


I’ll have a cup of vodka with that! Pasta alla Vecchia Bettola

I’ll have a cup of vodka with that! Pasta alla Vecchia Bettola

“I’d much rather eat pasta and drink wine than be a size zero.”                                            —Sophia Loren   I’m with Sophia. Why not start your pasta…

It’s a pizza!

It’s a pizza!

This, quite deservedly, is King Arthur Flour’s recipe of the year. It is a wonderful puffy deep-dish pizza you can make in your cast-iron skillet. Easy-peasy, by the way. Here is the recipe.     It’s a pizza! Save Recipe Print Recipe My Recipes My…

Carpe Diem and Pass the Chiles: Spicy Spinach, Bean and Pasta Soup

Carpe Diem and Pass the Chiles: Spicy Spinach, Bean and Pasta Soup


“Ask not (’tis forbidden knowledge), what our destined term of years,
Mine and yours; nor scan the tables of your Babylonish seers.
Better far to bear the future, my Leuconoe, like the past,
Whether Jove has many winters yet to give, or this our last;
This, that makes the Tyrrhene billows spend their strength against the shore.
Strain your wine and prove your wisdom; life is short; should hope be more?
In the moment of our talking, envious time has ebb’d away.
Seize the present; trust tomorrow e’en as little as you may.”

                                                —-Horace


Seize the day! Seems like pretty good advice in perilous times.

In that spirit, be advised that you can eat all the chiles your stomach will allow with no damage to your taste buds.

As it turns out, spicy foods don’t kill our taste buds, the culprit is most likely age. Good news. Bad news.

According to Paul Bosland, the director of the Chile Pepper Institute at New Mexico Sate University (I know. Who knew there was a chile pepper institute anywhere?), we’re born with around 10,000 taste buds. For much of our lives, the taste bud cells replace themselves. Eventually, though, some of the cells lose their ability to replicate and our sense of taste diminishes. Bummer.

Interestingly, Bosland puts to bed an old myth about spicy foods like hot chiles damaging one’s taste buds.  This, he says, is just not the case. Instead, he says that the active ingredient in spicy peppers, capsaicin, plays a trick on us. When we eat spicy foods, the capsaicin activates our taste receptors and sends a false danger message to our brains. Somehow, through the evolutionary process, “certain pain receptors in our nerve endings react to capsaicin in the same way they react to heat…and our brain starts producing endorphins to block that pain,” he says. That reaction causes our mouths to numb when we consume capsaicin and oftentimes we jump to the false conclusion that our taste buds are being burned to oblivion.  Not so. Who knew?

So, if spice is your thing (as it is mine), you can enjoy spicy foods with wild abandon.

Here is a great spicy soup recipe. You can also make a non-spicy version of this soup by omitting the Soyrizo.

Spinach, Bean and Pasta Soup
Save RecipeSave Recipe

Ingredients

  • Canola or olive oil
  • 1 Soyrizo Sausage (6 oz. or 1/2 a link--adjust amount to match your heat tolerance)
  • 1 onion (chopped)
  • 3 garlic cloves (crushed)
  • 2 C. water (or more--to your taste)
  • 3/4 to 1 C. small dry pasta
  • 14 oz. can tomato sauce
  • 3 C. vegetable stock (or more)
  • 1 t. dried oregano (or basil)
  • Salt and pepper to taste
  • A few big handfuls to spinach (coarsely chopped)
  • 1 15-ounce can red kidney beans (rinsed and drained)
  • Freshly-grated Parmesan cheese

Instructions

  1. Heat oil in a large soup pot and saute and onion and garlic until they are soft. When the onion and garlic are cooked, stir in crumbled soyrizo sausage. Stir to mix.
  2. Add water, dry pasta, tomato sauce, vegetable stock, oregano and salt and pepper Bring soup to a boil and then reduce the heat. Simmer soup for about 15 minutes until the pasta is tender.
  3. Chop and add the fresh spinach to the soup. Add the rinsed beans. Continue cooking the soup for another 5 minutes. Add additional water or broth to thin the soup to a consistency you like.
  4. Ladle the soup into bowls and garnish with freshly-grated Parmesan cheese.
  5. Cook's Note: Soyrizo is a vegetarian substitute for chorizo. It is available at Trader Joe's and at most major supermarkets. Regular chorizo would work, too.

Nutrition

Calories

708 cal

Fat

49 g

Carbs

39 g

Protein

28 g
Click Here For Full Nutrition, Exchanges, and My Plate Info
7.8.1.2
233
https://bluecayenne.com/carpe-diem-and-pass-the-chiles-spicy-spinach-bean-and-pasta-soup

This soup is adapted from a recipe that appears in Julie Van Rosendaal’s and Sue Duncan’s wonderful cookbook, Spilling the Beans. Their book is available on Amazon here.

Pickled Beet Salad With Puy Lentils, Baby Spinach and Feta

Pickled Beet Salad With Puy Lentils, Baby Spinach and Feta

This is a beautiful salad inspired by Hetty McKinnon’s recipe for Pickled Beetroot With Puy Lentils, Baby Spinach and Cheddar in her wonderful cookbook Community. You have a lot of colorful choices within the beet (Beta vulgaris) family, too. You can make this salad as…